Comprehensive data exploration with Python 필사
라이브러리 호출
import pandas as pd
import matplotlib.pyplot as plt
import seaborn as sns
import numpy as np
from scipy.stats import norm
from sklearn.preprocessing import StandardScaler
from scipy import stats
import warnings
warnings.filterwarnings('ignore')
%matplotlib inline
SciPy란?
- SciPy(‘사이파이’라고 읽음)는 과학기술계산을 위한 Python 라이브러리이다. NumPy, Matplotlib, pandas, SymPy와 연계되어 있다(특히 NumPy와).
- stats 서브패키지는 확률분포 분석을 위한 다양한 기능을 제공
- warnings.filterwarnings(‘ignore’) : 경고 메시지 무시하기
Comprehensive data exploration with Python
이 노트북에서 주목하는 내용
- 문제를 이해하기.
- 일변량 & 다변량 학습
- 데이터셋 정돈(결측치, 이상치 제거 및 분류형 변수)
- 가설을 테스트
# 데이터 호출
df_train = pd.read_csv("data/train.csv")
df_train.head(2)
| Id | MSSubClass | MSZoning | LotFrontage | LotArea | Street | Alley | LotShape | LandContour | Utilities | ... | PoolArea | PoolQC | Fence | MiscFeature | MiscVal | MoSold | YrSold | SaleType | SaleCondition | SalePrice | |
|---|---|---|---|---|---|---|---|---|---|---|---|---|---|---|---|---|---|---|---|---|---|
| 0 | 1 | 60 | RL | 65.0 | 8450 | Pave | NaN | Reg | Lvl | AllPub | ... | 0 | NaN | NaN | NaN | 0 | 2 | 2008 | WD | Normal | 208500 |
| 1 | 2 | 20 | RL | 80.0 | 9600 | Pave | NaN | Reg | Lvl | AllPub | ... | 0 | NaN | NaN | NaN | 0 | 5 | 2007 | WD | Normal | 181500 |
2 rows × 81 columns
df_train.columns
Index(['Id', 'MSSubClass', 'MSZoning', 'LotFrontage', 'LotArea', 'Street',
       'Alley', 'LotShape', 'LandContour', 'Utilities', 'LotConfig',
       'LandSlope', 'Neighborhood', 'Condition1', 'Condition2', 'BldgType',
       'HouseStyle', 'OverallQual', 'OverallCond', 'YearBuilt', 'YearRemodAdd',
       'RoofStyle', 'RoofMatl', 'Exterior1st', 'Exterior2nd', 'MasVnrType',
       'MasVnrArea', 'ExterQual', 'ExterCond', 'Foundation', 'BsmtQual',
       'BsmtCond', 'BsmtExposure', 'BsmtFinType1', 'BsmtFinSF1',
       'BsmtFinType2', 'BsmtFinSF2', 'BsmtUnfSF', 'TotalBsmtSF', 'Heating',
       'HeatingQC', 'CentralAir', 'Electrical', '1stFlrSF', '2ndFlrSF',
       'LowQualFinSF', 'GrLivArea', 'BsmtFullBath', 'BsmtHalfBath', 'FullBath',
       'HalfBath', 'BedroomAbvGr', 'KitchenAbvGr', 'KitchenQual',
       'TotRmsAbvGrd', 'Functional', 'Fireplaces', 'FireplaceQu', 'GarageType',
       'GarageYrBlt', 'GarageFinish', 'GarageCars', 'GarageArea', 'GarageQual',
       'GarageCond', 'PavedDrive', 'WoodDeckSF', 'OpenPorchSF',
       'EnclosedPorch', '3SsnPorch', 'ScreenPorch', 'PoolArea', 'PoolQC',
       'Fence', 'MiscFeature', 'MiscVal', 'MoSold', 'YrSold', 'SaleType',
       'SaleCondition', 'SalePrice'],
      dtype='object')
위 데이터에서 얻을 수 있는 것은?
각 변수들을 보고 이들이 의미하는 바를 알아내는 것. 다소 시간이 걸리더라도, 이 과정을 통해 우리의 입맛에 맞게 데이터를 수정할 수 있음. 위 변수들을 아래의 변수들로 수정할 수 있음.
- Variable - 변수명
- Type - 수치형, 분류형 변수
- Segment - building(빌딩명), space(집의 속성), location(집이 위치한 장소)
- Expectation - ‘SalePrice’에 미치는 영향에 대한 기대. categorical scale로는 high, medium, low로 사용할 수 있다.
- Conclusion - 데이터를 대략적으로 파악한 뒤, 그에 대한 결론. Expectation와 같은 categorical scale을 사용할 수 있다.
- Comments - 일반적인 코멘트
Type과 Segment는 미래에 영향이 있을 수 있는 가능성을 가진 reference. 하지만, Expectiation은 분석을 하는데 있어 큰 영향을 가진 부분이다. 이 column을 채우기 위해선 변수에 대한 개별적인 파악과 근본적인 질문이 필요하다.
- 이 변수들이 우리가 집을 사는데 필요한가?
- 만약 그렇다면, 얼마나 중요한가?
- 이 정보가 이미 다른 변수들에 들어가있는가?
첫번째 작업 : ‘SalePrice’ 분석
# describe 분석
df_train["SalePrice"].describe()
count      1460.000000
mean     180921.195890
std       79442.502883
min       34900.000000
25%      129975.000000
50%      163000.000000
75%      214000.000000
max      755000.000000
Name: SalePrice, dtype: float64
sns.distplot(df_train["SalePrice"]);

- 정규분포에서 벗어나는 모습
- 양적인 skewness를 보임
# skewness : 왜도, kurtosis : 첨도
print("Skewness : %f"%df_train["SalePrice"].skew())
print("kurtosis : %f"%df_train["SalePrice"].kurt())
Skewness : 1.882876
kurtosis : 6.536282
# scatter plot
var = 'GrLivArea'
data = pd.concat([df_train["SalePrice"], df_train[var]], axis = 1)

# ylim = y축 범위 설정
data.plot.scatter(x = var, y = "SalePrice", ylim = (0,800000));

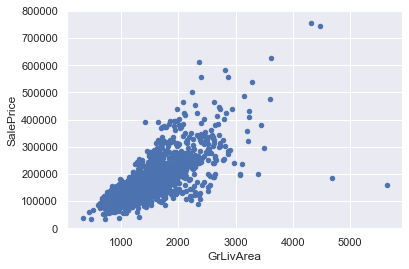
- GrLivArea 와 SalePrice은 선형적인 관계를 가지는 형상을 띔
var = 'TotalBsmtSF'
data = pd.concat([df_train['SalePrice'], df_train[var]], axis=1)
data.plot.scatter(x=var, y='SalePrice', ylim=(0,800000));

- TotalBsmtSF과 SalePrice은 GrLivArea 보다 더 큰 관계가 있는 것으로 보임
var = 'OverallQual'
data = pd.concat([df_train['SalePrice'], df_train[var]], axis=1)
f, ax = plt.subplots(figsize=(8, 6))
fig = sns.boxplot(x=var, y="SalePrice", data=data)
fig.axis(ymin=0, ymax=800000);

- ‘SalePrice’ 과 ‘OverallQual’도 선형적 관계로 보여짐
var = "YearBuilt"
data = pd.concat([df_train["SalePrice"], df_train[var]], axis= 1)
f, ax = plt.subplots(figsize = (16, 8))
fig = sns.boxplot(x = var, y = "SalePrice", data = data)
fig.axis(ymin = 0, ymax = 800000);
plt.xticks(rotation = 90);

- 강한 경향을 보이지는 않지만, SalePrice는 과거에 비해 비용이 상승한 것으로 보인다.
Correlation matrix (heatmap style)
corrmat = df_train.corr()
f, ax = plt.subplots(figsize = (12,9))
sns.heatmap(corrmat, vmax = .8,  square = True, cmap = "Greens");

*눈에 띄는 지포8
- TotalBsmtSF’ and ‘1stFlrSF’ variables
- ‘GarageX’ variables
- multicollinearity situation의 가능성 존재.
# SalePrice correlation matrix
plt.figure(figsize = (10,10))
k = 10 # number of variable for heatmap
cols = corrmat.nlargest(k, "SalePrice")["SalePrice"].index
cm = np.corrcoef(df_train[cols].values.T)
sns.set(font_scale = 1.25)
hm = sns.heatmap(cm, cbar = True, annot = True, square = True, fmt = ".2f"
                ,annot_kws = {'size':10}, yticklabels = cols.values,
                 xticklabels = cols.values, cmap = "Blues")
plt.show()

- ‘SalePrice’와 ‘OverallQual’, ‘GrLivArea’, 그리고 ‘TotalBsmtSF’는 매우 강한 상관관계를 가짐
- ‘GarageCars’ 와 ‘GarageArea’도 매우 강한 상관관계를 가지는 변수. 하지만, 차고와 차고에 주차된 자동차는 필연관계임. 고로, 이중 하나의 변수만 사용해도 무방. 여기서는 “SalePrice”와 높은 상관관계를 가진 ‘GarageCars’를 사용할 것이다.
- ‘TotalBsmtSF’ 와 ‘1stFloor’, ‘TotRmsAbvGrd’ 와 ‘GrLivArea’ 역시 위와 같은 관계.
# scatterplot
sns.set()
cols = ['SalePrice', 'OverallQual', 'GrLivArea', 'GarageCars',
        'TotalBsmtSF', 'FullBath', 'YearBuilt']
sns.pairplot(df_train[cols], size = 2.5)
plt.show();

- 이미 앞선 EDA를 통해 변수들간의 상관관계를 알아봤음에도 불구하고, 이러한 mega scatter plot 자료는 변수들의 연관성을 합리적으로 볼 수 있는 아이디어를 제공할 수 있다.
- ‘TotalBsmtSF’ 와 ‘GrLiveArea’는 경계선 역할을 하는 것처럼 linear한 line 형태의 dots 형태를 띄고 있음.
- ‘SalePrice’ 와 ‘YearBuilt’는 아랫쪽에 점들이 대거 몰린 것을 확인할 수 있다.
결측치 찾기
- 결측치가 얼마나 퍼져있는지?
- missing data가 random한지 아니면 pattern이 있는지?
결측치는 표본 데이터의 사이즈를 줄일 수 있기 때문에 중요하다. 실질적으로, missing data가 편향되거나 잘못된 정보를 주지 않는지를 확인해야한다.
#missing data
total = df_train.isnull().sum().sort_values(ascending=False)
percent = (df_train.isnull().sum()/df_train.isnull().count()).sort_values(ascending=False)
missing_data = pd.concat([total, percent], axis=1, keys=['Total', 'Percent'])
missing_data.head(20)
| Total | Percent | |
|---|---|---|
| PoolQC | 1453 | 0.995205 |
| MiscFeature | 1406 | 0.963014 |
| Alley | 1369 | 0.937671 |
| Fence | 1179 | 0.807534 |
| FireplaceQu | 690 | 0.472603 |
| LotFrontage | 259 | 0.177397 |
| GarageYrBlt | 81 | 0.055479 |
| GarageCond | 81 | 0.055479 |
| GarageType | 81 | 0.055479 |
| GarageFinish | 81 | 0.055479 |
| GarageQual | 81 | 0.055479 |
| BsmtFinType2 | 38 | 0.026027 |
| BsmtExposure | 38 | 0.026027 |
| BsmtQual | 37 | 0.025342 |
| BsmtCond | 37 | 0.025342 |
| BsmtFinType1 | 37 | 0.025342 |
| MasVnrArea | 8 | 0.005479 |
| MasVnrType | 8 | 0.005479 |
| Electrical | 1 | 0.000685 |
| Id | 0 | 0.000000 |
- 약 15%의 결측치를 확인.
- 1건만 있는 “Electrical”을 제외한 결측치가 있는 변수들을 삭제(대체하지 않을 예정)할 것. 왜냐하면, 집을 구매하는데 있어 크게 중요한 요소들이 아니기 때문.
- ‘PoolQC’, ‘MiscFeature’, ‘FireplaceQu’은 Outliers들과 큰 연관이 되어있음.
# dealing with missing data

df_train = df_train.drop((missing_data[missing_data["Total"]>1]).index, 1)
df_train = df_train.drop(df_train.loc[df_train["Electrical"].isnull()].index)
df_train.isnull().sum().max()
0
Outliers
- 모델에 영향을 끼치는 인자
- Outliers는 복잡한 subject이고 주의를 기울여야 한다.
- outlier를 정의할 수 있는 threshold를 만드는 것이 1차 목표.
- pandas의 StandardScaler()기능을 이용해서 스케일링을 진행한다.
# standardizing data
# np.newaxis = numpy array의 차원을 늘려주는 역할. 1D -> 2D, 2D -> 3D
saleprice_scaled = StandardScaler().fit_transform(df_train["SalePrice"]
                                                 [:, np.newaxis]);
# [:, 0] : Dataframe에서 열의 정보(가로, x축)의 데이터를 가져오기
# .argsort() : saleprice_scaled[:, 0]의 순서를 숫자로 나타내며 리스트 형태로 출력해줌
low_range = saleprice_scaled[saleprice_scaled[:, 0].argsort()][:10]
high_range = saleprice_scaled[saleprice_scaled[:, 0].argsort()][-10:]
print('outer lange (low) of the distribution:')
print(low_range)
print("\noutre range (high) of the distribution:")
print(high_range)
outer lange (low) of the distribution:
[[-1.83820775]
 [-1.83303414]
 [-1.80044422]
 [-1.78282123]
 [-1.77400974]
 [-1.62295562]
 [-1.6166617 ]
 [-1.58519209]
 [-1.58519209]
 [-1.57269236]]

outre range (high) of the distribution:
[[3.82758058]
 [4.0395221 ]
 [4.49473628]
 [4.70872962]
 [4.728631  ]
 [5.06034585]
 [5.42191907]
 [5.58987866]
 [7.10041987]
 [7.22629831]]
- low range는 0에서 멀리 안떨어짐
- high range는 0에서 멀리 떨어져있으며, 심한 경우는 7까지 벌어짐.
#bivariate analysis saleprice/grlivarea

var = 'GrLivArea'
data = pd.concat([df_train['SalePrice'], df_train[var]], axis=1)
data.plot.scatter(x=var, y='SalePrice', ylim=(0,800000));
*c* argument looks like a single numeric RGB or RGBA sequence, which should be avoided as value-mapping will have precedence in case its length matches with *x* & *y*. Please use the *color* keyword-argument or provide a 2D array with a single row if you intend to specify the same RGB or RGBA value for all points.
Who is “SalePrice”?
데이터를 테스트하기 위해선 4가지 가정이 필요
- Normality : 데이터가 정규분포처럼 보여야 한다
- Homoscedasticity : 동종성. error가 모든 독립 변수에 동일하게 들어있는 것이 바람직함.
- Linearity : 선형도. scatterplot으로 확인하는 것이 가장 흔한 방법.
- Absence of correlated errors : error가 다른 error와 연관이 있는 것. 발생 할 경우, 다른 변수들을 넣어서 해결방법을 탐구할 것.
#histogram and normal probability plot

# fit : random variable object, optional
#       An object with `fit` method, returning a tuple that can be passed to a
#     `pdf` method a positional arguments following a grid of values to
#     evaluate the pdf on.
sns.distplot(df_train['SalePrice'], fit=norm);
fig = plt.figure()
res = stats.probplot(df_train['SalePrice'], plot=plt)
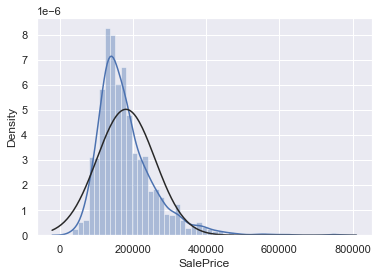
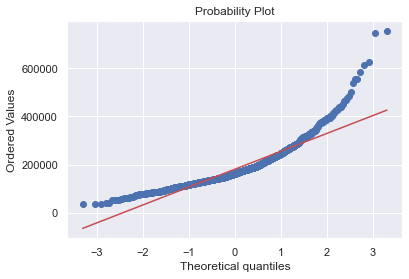
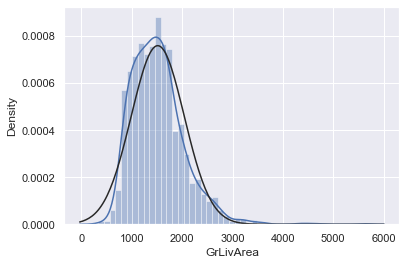
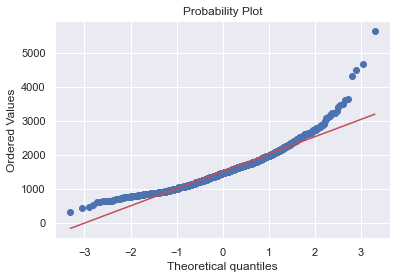
- ‘SalePrice’는 정상적으로 보이지 않음.
- peakedness와 양적인 skewness를 보이고 있으며, diagonal line을 따르지 않고 있음.
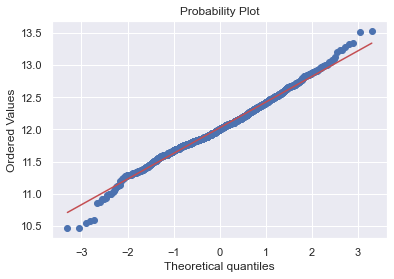
- log transform을 통해서 정규분포에 가깝게 바꿔주자
# applying log transformation

df_train['SalePrice'] = np.log(df_train['SalePrice'])
# transformed histogram and normal probability plot

sns.distplot(df_train['SalePrice'], fit=norm);
fig = plt.figure()
res = stats.probplot(df_train['SalePrice'], plot=plt)

# histogram and normal probability plot

sns.distplot(df_train['GrLivArea'], fit=norm);
fig = plt.figure()
res = stats.probplot(df_train['GrLivArea'], plot=plt)
#data transformation

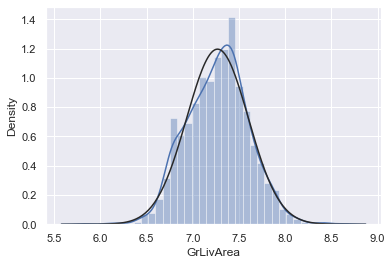
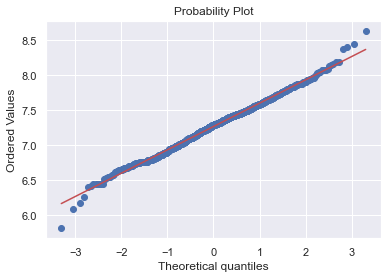
df_train['GrLivArea'] = np.log(df_train['GrLivArea'])
#transformed histogram and normal probability plot

sns.distplot(df_train['GrLivArea'], fit=norm);
fig = plt.figure()
res = stats.probplot(df_train['GrLivArea'], plot=plt)
#histogram and normal probability plot

sns.distplot(df_train['TotalBsmtSF'], fit=norm);
fig = plt.figure()
res = stats.probplot(df_train['TotalBsmtSF'], plot=plt)
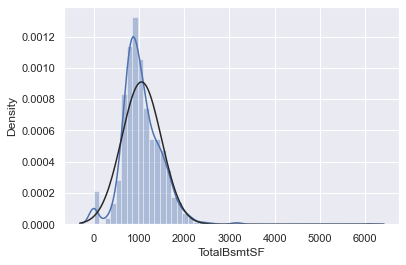
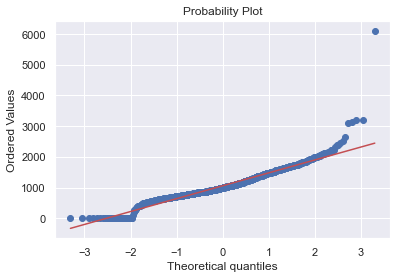
- TotalBsmtSF은 위 둘과는 다른 형태를 보이고 있음.
- 일반적으로는 skwness를 보이고 있음.
- value가 zero인 값들이 눈에 띄게 관측된다.
- 가장 큰 문제는 0은 log transformation을 할 수 없다.
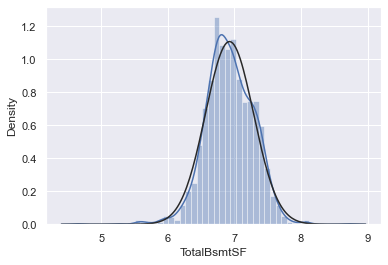
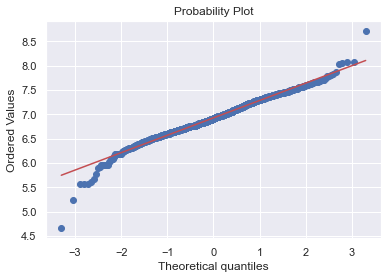
이를 해결하기 위해서는 TotalBsmtSF을 기반으로 하는 새로운 변수를 만든뒤, 0을 제외한 변수들을 log transformation을 진행할 것이다.
이 노트북의 필자는 이 방법이 정답인지에 대한 확신이 없다. 그래서 ‘하이리스크 엔지니어링’이라고 개인적으로 부른다고 한다.
# create column for new variable (one is enough because it's a binary categorical feature)
# if area>0 it gets 1, for area==0 it gets 0

df_train['HasBsmt'] = pd.Series(len(df_train['TotalBsmtSF']), index=df_train.index)
df_train['HasBsmt'] = 0
df_train.loc[df_train['TotalBsmtSF']>0,'HasBsmt'] = 1
# transform data

df_train.loc[df_train['HasBsmt']==1,'TotalBsmtSF'] = np.log(df_train['TotalBsmtSF'])
# histogram and normal probability plot

sns.distplot(df_train[df_train['TotalBsmtSF']>0]['TotalBsmtSF'], fit=norm);
fig = plt.figure()
res = stats.probplot(df_train[df_train['TotalBsmtSF']>0]['TotalBsmtSF'], plot=plt)
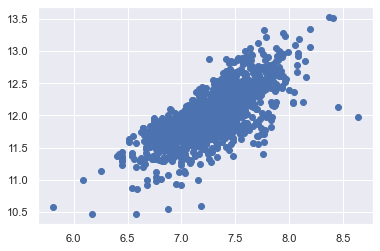
Search for writing ‘homoscedasticity’ right at the first attempt
The best approach to test homoscedasticity for two metric variables is graphically.
# scatter plot

plt.scatter(df_train['GrLivArea'], df_train['SalePrice']);
# scatter plot

plt.scatter(df_train[df_train['TotalBsmtSF']>0]['TotalBsmtSF'],
            df_train[df_train['TotalBsmtSF']>0]['SalePrice']);
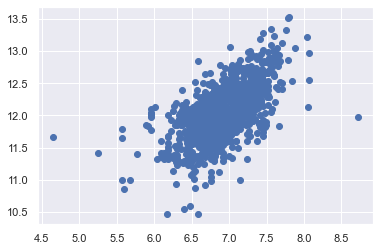
- log 전환 전의 scatter plot과 비교 했을 때 콘 형태의 모양이 사라진 모습을 확인할 수 있다.
- 이제 one-hot-encoding을 통해서 모델 학습에 최적화되게 해주도록 한다.
# convert categorical variable into dummy

df_train = pd.get_dummies(df_train)
